Installing Jekyll on Windows
In which the intrepid developer describes the journey to get up-and-running with Jekyll development on Windows 10.
Last updated: July 28, 2017
Jekyll: what, why, how
If you’ve been paying attention to trends in web development over the past few years, you’ve likely noticed the movement toward static website generators. Makes sense, especially with a “mobile-first” motto, since static websites can be delivered much faster (among other benefits).
Jekyll is one of the leading players in the static website generator arena. Without going into too much detail, Jekyll takes plaintext (Markdown) files, renders them through user-defined layout templates, and spits out static HTML files, with everything nicely linked together. One of the aspects that makes it especially appealing is that it is used by GitHub Pages, which provides free personal and project websites for GitHub users. This means that if you already have a GitHub account, you also already have a web host – all you need to do is set it up.
GitHub + Jekyll: starting out
My journey to do just that started with this article, which describes how to get started with Jekyll and GitHub pages. This guide walks you through the (very easy) process of forking a starting repository to your own GitHub Pages site and customizing it from there. In fact, you don’t even have to install Jekyll (or anything else) locally at all – GitHub Pages builds and serves the website for you, so you can simply push your unbuilt files to your repo as needed.
However, if you are interested at all in developing your own theme (or any other major customization effort), you’ll probably want to install Jekyll locally so that you can test your changes without having to push and wait for GitHub to build your site each time. If you’re using a Mac or Linux, installing Jekyll is super-easy and there are already tons of guides addressing the process (so I won’t). If you’re using Windows… well, that’s a different story entirely.
Where’s my Windows terminal?
Most of the guides written for how to install Jekyll (and all of its dependencies, such as Ruby) describe the command-line process used for Linux, Unix, or macOS. If you’re stuck using Windows, we need to take a step back first and get something that will provide us with a similar “terminal” install environment.
The official docs for Jekyll include instructions for installing Jekyll on Windows but they are, frankly, a bit of a mess (and somewhat incomplete – I couldn’t get it working as written.) However, those instructions did point me toward the new Bash on Ubuntu on Windows, which is exactly what’s needed here – an actual, native (or as close as we can get…) bash terminal! Ideally, once we get that installed, we should be able to simply follow along with the Linux/Unix/macOS directions, rather than trying to cobble together a working system from VMs, emulators, and Windows-specific package managers.
In practice, it’s not quite so easy. The Windows Subsystem for Linux (WSL) that enables the bash terminal needs certain pre-requisites and certain updates, that aren’t fully covered in the official guide. I hope to remedy that here!
My recommendation if you’re running Windows 10: ignore the official instructions linked above, and instead refer to the guide below.
(My recommendation if you’re running Windows <10: upgrade to Windows 10.)
Installing Jekyll on Windows: step by step
The steps below are what have worked for me so far; as of July 2017, I’ve used these instructions to install Jekyll locally on the following devices:
- A Samsung laptop (Intel i5 2x2.5GHz / 8GB RAM), Windows 10 Pro version 1607, build 14393.1480 (later updated to version 1703)
- A Windows Surface (Intel i7 2x2GHz / 16GB RAM), Windows 10 Pro version 1703, build 15063.483
These instructions are adapted from the official Microsoft Bash on Ubuntu on Windows installation guide and Dave Ruper’s excellent guide to installing Jekyll on Windows.
Pre-Requisites
-
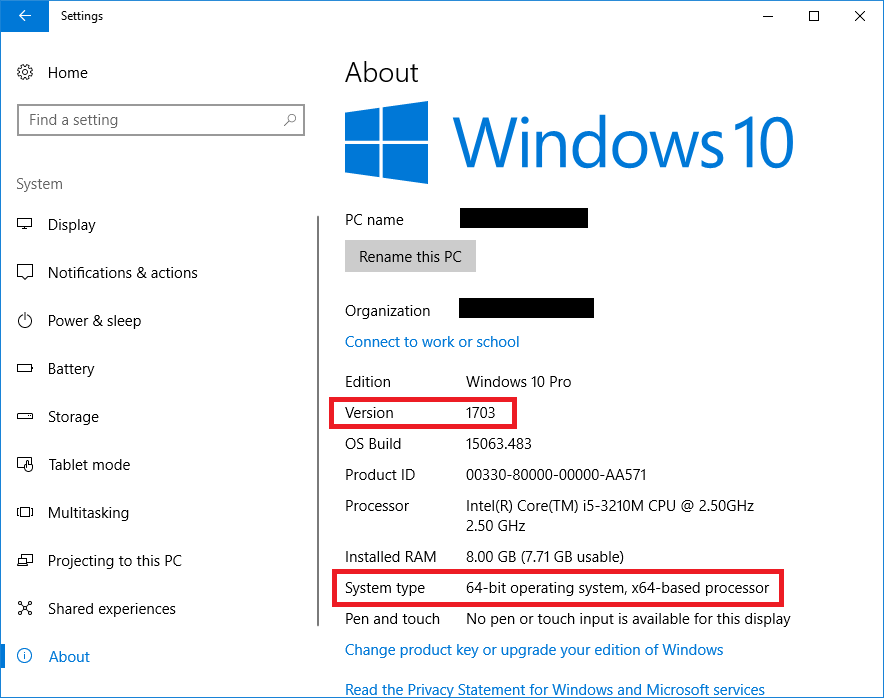
You need to be running a 64-bit version of Windows 10, updated to at least Version 1607 (the “Anniversary Update”) or later. (Version 1703, the “Creators Update”, is very highly recommended, as it makes a LOT of improvements to the WSL.) To check your version, go to Settings > System > About:
To update if needed: go to Settings > Update & security > Windows Update.
-
To avoid permission / “access denied” errors, enable “Developer Mode” by going to Settings > Update & security > For developers (scroll down the left-side list until you see it) and checking “Developer Mode”. Wait for it to do its thing, then reboot.
Also: it is recommended for the below instructions to always launch Windows Command Prompt in Administrator mode. To do so: Start > Search, type in
cmd, right-click on Command Prompt and choose “Run as Administrator” from the right-click menu.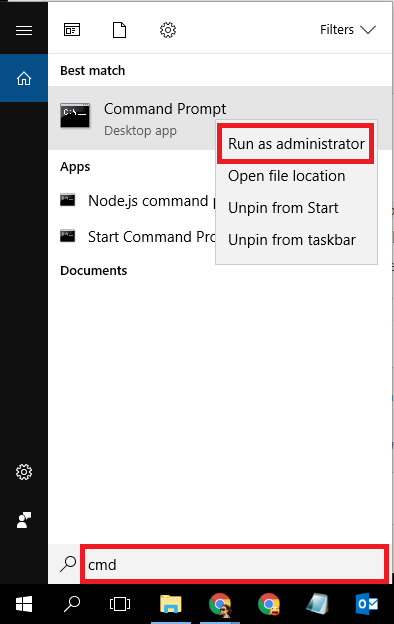
To make it easier to “Run as Administrator” each time: Create a shortcut to Command Prompt (on your Desktop, Start Menu, or Taskbar), right-click the shortcut, right-click the “Command Prompt” name in the pop-up menu and choose “Properties”, click the “Advanced” button, and check “Run as administrator”.
Installing Ubuntu
-
Install the “Windows Subsystem for Linux” (WSL). There are a few different ways that I’ve found to install it; hopefully at least one of these will work for you!
-
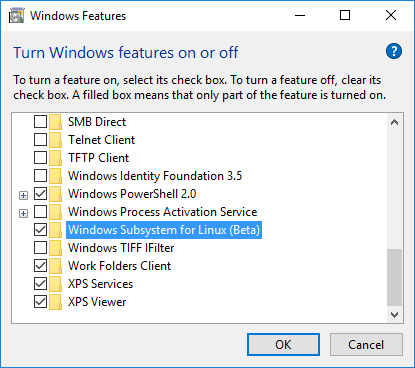
(probably the easiest) Open Windows Features (Start > Search, or use Cortana) and enable “Windows Subsystem for Linux”.
- (per the official instructions) Run PowerShell as Administrator and run:
Enable-WindowsOptionalFeature -Online -FeatureName Microsoft-Windows-Subsystem-LinuxThen reboot when prompted.
- (per a WSL GitHub Issues thread) Run Command Prompt as Administrator and type:
dism.exe /online /enable-feature /featurename:Microsoft-Windows-Subsystem-Linux
-
-
Install Ubuntu by opening a Command Prompt and typing:
bashYou’ll be prompted to accept a license agreement, then Ubuntu will be downloaded and installed. Once installed, you’ll be prompted to create a Unix username and password (this is what you’ll use for any instructions which require
sudo).In the future, you can launch a new
bashshell the same way, simply by runningbashfrom a Windows command prompt.Also: DO NOT create or modify files in the
C:\Users\*yourUserName*\AppData\Local\lxss\directory using Windows apps or tools! This is the directory where the Ubuntu stuff is installed, and trying to manage it via the Windows filesystem could cause corruption and/or data loss. See this post for more info.
Installing dependencies
According to the official docs, installing Jekyll should be straight-forward if all requirements are met. These include:
- GNU/Linux, Unix, or macOS (satisfied with our installation of WSL just now)
- Ruby version 2.1 or above, including all development headers
- RubyGems
- GCC and Make
As Dave points out in his guide, this Ubuntu-on-Windows installation is completely empty, containing none of the default libraries or utilities that one would expect to be present in a fresh install of Ubuntu. To fix that,
- Launch
bashand enter the following commands:$ sudo -s $ apt update $ apt install make gcc(The
$represents the bash command prompt, and should not be typed as part of your command.)Note that while it’s not really considered good practice to run everything as superuser/root (which is what the
sudo -sdoes), it’s required for most of the install commands, and it overcomes any potential permission-based errors as well. (The rest of the install instructions in this guide assume you are using sudo.) - Once those are set up, we can install Ruby:
$ apt install ruby-full ruby-all-dev build-essential $ gem update - Jekyll also seems to require a “JavaScript runtime”, which Node.js (ha!) satisfies just fine:
$ apt install nodejs - The latest version of Jekyll (3.5.1 as of this writing) also appears to require “bundler” in order to run. Install that with the command:
$ gem install bundler
Installing Jekyll
- Once all the necessary dependencies are installed, we can (finally!) install Jekyll:
$ gem install jekyll - To make a new (default) Jekyll project,
cdinto the directory you want to house your project and run:$ jekyll new my-websiteThis will create a new folder called
my-websitecontaining the default Jekyll files. (Note that I even needed to run this as sudo, otherwise would get a “not permitted” error that I couldn’t figure out how to fix via chmod.) - To have Jekyll launch a local web server hosting your project,
cd my-website(or whatever you named your new Jekyll project) and use the command:$ jekyll serveYou can get Jekyll to watch for changes to your project files and automatically rebuild your site by using the “watch” flag:
$ jekyll serve -w -
Browse to your site at http://localhost:4000. Jump for joy.
(Jumping in rage instead? Consult the “It’s Not Working!” section below.)
Setting up gems
The directions above are the minimum necessary to get Jekyll up-and-running. However, if you want to use Ruby gems to manage dependencies or plugins for your site, you’ll have to install other packages as well.
For example, if you’re hosting your site on GitHub-Pages, you may want to install the github-pages gem, to ensure that your local build environment matches GitHub’s. As with everything else, though, of course we must first install some required libraries:
$ apt install zlibc zlib1g-dev libxml2 libxml2-dev libxslt1.1 libxslt1-dev
$ gem install nokogiri
If that last command doesn’t work, try
$ gem install nokogiri -- --use-system-libraries
Now that the required libraries are installed/updated, there are a couple of different ways you could go about installing the github-pages gem itself:
- (Generally not recommended) To install the gem and have it affect the entire Ruby / Jekyll environment, run:
$ gem install github-pagesThis will unpack and install the libraries contained in this gem into your overall Linux / Ruby / Jekyll environment, where they will affect every project. Probably NOT what you want, but maybe it is? (I ain’t judgin’.)
-
The recommended way is to have gems run on a per-project basis through the use of a “Gemfile”. To set this up, do the following instead:
- Install the Bundler package manager if needed:
sudo gem install bundler - Create (or edit) a
Gemfile(no file extension) in your project directory and add the the following lines to it:source 'https://rubygems.org' gem 'github-pages', group: :jekyll_plugins - Inside the directory containing the above Gemfile, run
bundle update, followed bybundle install. - Important: From now on, whenever you would
jekyll servethis project, you need to runbundle exec jekyll serveinstead. - Every so often, run
bundle updateto update all your gems to the latest version.
- Install the Bundler package manager if needed:
It’s Not Working!
You might encounter some errors along the way, either when trying to build/serve your Jekyll site locally, or in the site itself after it’s built. If so, here are some things to try:
-
If you run into errors when trying to
jekyll servelocally, try one or more of the following:- If the error message includes the text
Failed to watchand/or mentions something calledinotify, you are likely suffering from the bug described in Dave’s guide to installing Jekyll. Try running either:jekyll serve --no-watchorjekyll serve -w --force_polling
Also, upgrading to the Windows “Creators Update” (ver. 1703) should fix the “inotify” bug.
- For error messages which mention
bundler, try runningbundle exec jekyll serve.
- If the error message includes the text
- If you get errors when trying to
gem installorbundle updateanything, check Dave’s guide to installing Ruby to see how to install some dependencies that you might be missing (typically the XML libs for Nokogiri). To try to fix this,$ apt install zlibc zlib1g-dev libxml2 libxml2-dev libxslt1.1 libxslt1-dev $ gem install nokogiriIf that last command doesn’t work, try
$ gem install nokogiri -- --use-system-libraries -
If you notice lots of 404’s and/or lack of styling in your built site (whether locally or after deploying to GitHub), be sure to read Configuring Jekyll for User and Project GitHub Pages. It describes the correct way to set up your
_config.ymland theme templates so that your site just works, whether locally or hosted, whether it’s a GitHub user page or project page. -
In the worst-case scenario, you might want to try removing & re-installing the entire WSL framework. (Note: this is also Microsoft’s recommended method for upgrading your Ubuntu version, e.g. from 14.04 -> 16.04)
Warning: The command below will DELETE everything in the
C:\Users\*yourUserName*\AppData\Local\lxss\directory. Be sure to back up anything you want to keep beforehand.To completely remove the Ubuntu environment, run the following from a Windows command prompt:
C:\> lxrun /uninstall /full /yTo re-install the latest supported Ubuntu version, run
C:\> lxrun /install
Continuing the journey
I hope the guide was useful – let me know! Also, check out the following additional resources:
-
Jekyll docs obviously… (With the exception of the install instructions for Windows, the Jekyll docs are actually pretty informative and straightforward.)
-
Jekyll and GitHub tips for designers – Another “beginner” guide to Jekyll + GitHub
-
Jekyll for GitHub setup on MacOS in case you need it
-
My own ongoing journey to discover and implement Jekyll tips, tricks, and best practices
-
My collection of Jekyll-related Bookmarks
Thanks for reading! :)
■